


Android Dersleri serimizin CheckBox Kullanımı ve Switch dersimize hoş geldiniz. CheckBox ve Switch, seçim işlemlerinde kullandığımız yapılardan bazısıdır.
CheckBox Kullanımı
CheckBox ile bir ya da birçok seçeneği kullanıcıya seçime sunuyoruz. Bunun için verilebilecek en güzel cevap ve tanım aşağıdaki görsel olacaktır.
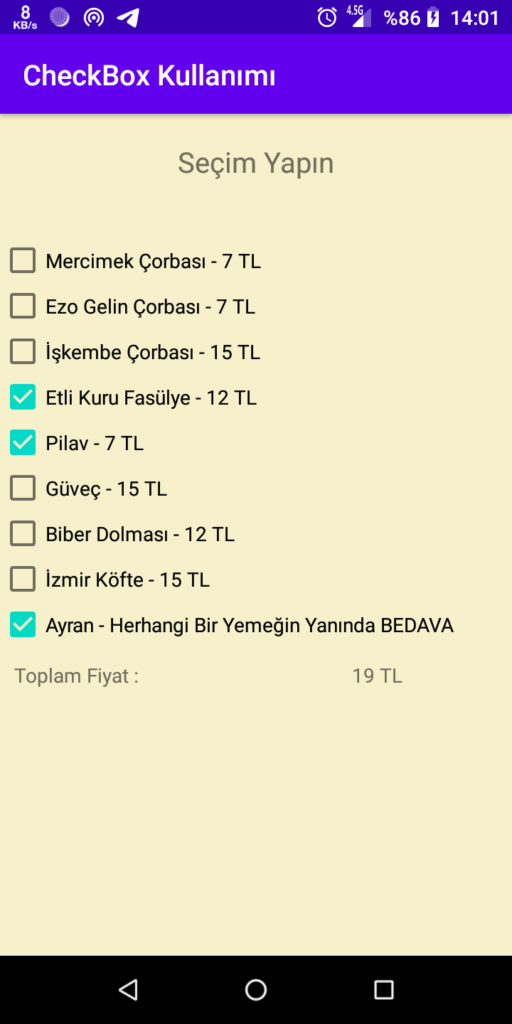
Üstteki görseldeki uygulamayı kodlamaya çalışacağız. Hem xml tarafında hem de java tarafında kod yazacağız. Çünkü bu uygulamada tasarımını yapmakla iş bitmez. Biz bir şeyleri seçiyorsa bir işlem gerçekleştirmemiz gerek.
Örnek CheckBox Kullanımı;
<CheckBox
    android:id="@+id/chb_mercimek"
    android:layout_width="wrap_content"
    android:layout_height="wrap_content"
    android:text="Mercimek Çorbası - 7 TL"/>
Örnek Uygulama;
Activity_main.xml dosyası;
<?xml version="1.0" encoding="utf-8"?>
<LinearLayout xmlns:android="http://schemas.android.com/apk/res/android"
    xmlns:app="http://schemas.android.com/apk/res-auto"
    xmlns:tools="http://schemas.android.com/tools"
    android:layout_width="match_parent"
    android:layout_height="match_parent"
    android:orientation="vertical"
    android:background="#F6F0CB"
    tools:context=".MainActivity">

    <TextView
        android:layout_width="match_parent"
        android:layout_height="wrap_content"
        android:text="Seçim Yapın"
        android:padding="20dp"
        android:textAlignment="center"
        android:textSize="20sp"
        android:layout_marginBottom="20dp"/>

    <CheckBox
        android:id="@+id/chb_mercimek"
        android:layout_width="wrap_content"
        android:layout_height="wrap_content"
        android:text="Mercimek Çorbası - 7 TL"/>

    <CheckBox
        android:id="@+id/chb_ezoGelin"
        android:layout_width="wrap_content"
        android:layout_height="wrap_content"
        android:text="Ezo Gelin Çorbası - 7 TL"/>

    <CheckBox
        android:id="@+id/chb_iskembe"
        android:layout_width="wrap_content"
        android:layout_height="wrap_content"
        android:text="İşkembe Çorbası - 15 TL"/>

    <CheckBox
        android:id="@+id/chb_kFasulye"
        android:layout_width="wrap_content"
        android:layout_height="wrap_content"
        android:text="Etli Kuru Fasülye - 12 TL"/>

    <CheckBox
        android:id="@+id/chb_pilav"
        android:layout_width="wrap_content"
        android:layout_height="wrap_content"
        android:text="Pilav - 7 TL"/>

    <CheckBox
        android:id="@+id/chb_guvec"
        android:layout_width="wrap_content"
        android:layout_height="wrap_content"
        android:text="Güveç - 15 TL"/>

    <CheckBox
        android:id="@+id/chb_biberDolma"
        android:layout_width="wrap_content"
        android:layout_height="wrap_content"
        android:text="Biber Dolması - 12 TL"/>

    <CheckBox
        android:id="@+id/chb_izmirKofte"
        android:layout_width="wrap_content"
        android:layout_height="wrap_content"
        android:text="İzmir Köfte - 15 TL"/>

    <CheckBox
        android:id="@+id/chb_ayran"
        android:layout_width="wrap_content"
        android:layout_height="wrap_content"
        android:text="Ayran - Herhangi Bir Yemeğin Yanında BEDAVA"/>

    <LinearLayout
        android:layout_width="match_parent"
        android:layout_height="wrap_content"
        android:padding="10dp"
        android:weightSum="10"
        android:orientation="horizontal">

        <TextView
            android:layout_width="match_parent"
            android:layout_height="wrap_content"
            android:layout_weight="5"
            android:text="Toplam Fiyat : "/>

        <TextView
            android:id="@+id/txt_toplamFiyat"
            android:layout_width="match_parent"
            android:layout_height="wrap_content"
            android:layout_weight="5"
            android:textAlignment="center"
            android:hint="0 TL"/>

    </LinearLayout>

</LinearLayout>
MainActivity.java dosyası;
package com.mrcaracal.myapplication;

import androidx.appcompat.app.AppCompatActivity;

import android.os.Bundle;
import android.view.View;
import android.widget.CheckBox;
import android.widget.TextView;

public class MainActivity extends AppCompatActivity {

    TextView txt_toplamFiyat;
    CheckBox chb_mercimek, chb_ezoGelin, chb_iskembe, chb_kFasulye, chb_pilav, chb_guvec, chb_biberDolma, chb_izmirKofte, chb_ayran;
    int tFiyat = 0;

    @Override
    protected void onCreate(Bundle savedInstanceState) {
        super.onCreate(savedInstanceState);
        setContentView(R.layout.activity_main);
        init();
        hesaplamaIslemi();
    }

    private void init(){
        txt_toplamFiyat = findViewById(R.id.txt_toplamFiyat);
        chb_mercimek = findViewById(R.id.chb_mercimek);
        chb_ezoGelin = findViewById(R.id.chb_ezoGelin);
        chb_iskembe = findViewById(R.id.chb_iskembe);
        chb_kFasulye = findViewById(R.id.chb_kFasulye);
        chb_pilav = findViewById(R.id.chb_pilav);
        chb_guvec = findViewById(R.id.chb_guvec);
        chb_biberDolma = findViewById(R.id.chb_biberDolma);
        chb_izmirKofte = findViewById(R.id.chb_izmirKofte);
        chb_ayran = findViewById(R.id.chb_ayran);
    }

    public void hesaplamaIslemi(){
        chb_mercimek.setOnClickListener(new View.OnClickListener() {
            @Override
            public void onClick(View view) {
                if (chb_mercimek.isChecked()){
                    tFiyat += 7;
                    txt_toplamFiyat.setText(tFiyat + " TL");
                }else {
                    tFiyat -= 7;
                    txt_toplamFiyat.setText(tFiyat + " TL");
                }
            }
        });

        chb_ezoGelin.setOnClickListener(new View.OnClickListener() {
            @Override
            public void onClick(View view) {
                if (chb_ezoGelin.isChecked()){
                    tFiyat += 7;
                    txt_toplamFiyat.setText(tFiyat + " TL");
                }else {
                    tFiyat -= 7;
                    txt_toplamFiyat.setText(tFiyat + " TL");
                }
            }
        });

        chb_iskembe.setOnClickListener(new View.OnClickListener() {
            @Override
            public void onClick(View view) {
                if (chb_iskembe.isChecked()){
                    tFiyat += 15;
                    txt_toplamFiyat.setText(tFiyat + " TL");
                }else {
                    tFiyat -= 15;
                    txt_toplamFiyat.setText(tFiyat + " TL");
                }
            }
        });

        chb_kFasulye.setOnClickListener(new View.OnClickListener() {
            @Override
            public void onClick(View view) {
                if (chb_kFasulye.isChecked()){
                    tFiyat += 12;
                    txt_toplamFiyat.setText(tFiyat + " TL");
                }else {
                    tFiyat -= 12;
                    txt_toplamFiyat.setText(tFiyat + " TL");
                }
            }
        });

        chb_pilav.setOnClickListener(new View.OnClickListener() {
            @Override
            public void onClick(View view) {
                if (chb_pilav.isChecked()){
                    tFiyat += 7;
                    txt_toplamFiyat.setText(tFiyat + " TL");
                }else {
                    tFiyat -= 7;
                    txt_toplamFiyat.setText(tFiyat + " TL");
                }
            }
        });

        chb_guvec.setOnClickListener(new View.OnClickListener() {
            @Override
            public void onClick(View view) {
                if (chb_guvec.isChecked()){
                    tFiyat += 15;
                    txt_toplamFiyat.setText(tFiyat + " TL");
                }else {
                    tFiyat -= 15;
                    txt_toplamFiyat.setText(tFiyat + " TL");
                }
            }
        });

        chb_biberDolma.setOnClickListener(new View.OnClickListener() {
            @Override
            public void onClick(View view) {
                if (chb_biberDolma.isChecked()){
                    tFiyat += 12;
                    txt_toplamFiyat.setText(tFiyat + " TL");
                }else {
                    tFiyat -= 12;
                    txt_toplamFiyat.setText(tFiyat + " TL");
                }
            }
        });

        chb_izmirKofte.setOnClickListener(new View.OnClickListener() {
            @Override
            public void onClick(View view) {
                if (chb_izmirKofte.isChecked()){
                    tFiyat += 15;
                    txt_toplamFiyat.setText(tFiyat + " TL");
                }else {
                    tFiyat -= 15;
                    txt_toplamFiyat.setText(tFiyat + " TL");
                }
            }
        });

        chb_ayran.setOnClickListener(new View.OnClickListener() {
            @Override
            public void onClick(View view) {
                if (chb_ayran.isChecked()){
                    tFiyat += 0;
                    txt_toplamFiyat.setText(tFiyat + " TL");
                }else {
                    tFiyat -= 0;
                    txt_toplamFiyat.setText(tFiyat + " TL");
                }
            }
        });
    }
}
Çıktı;
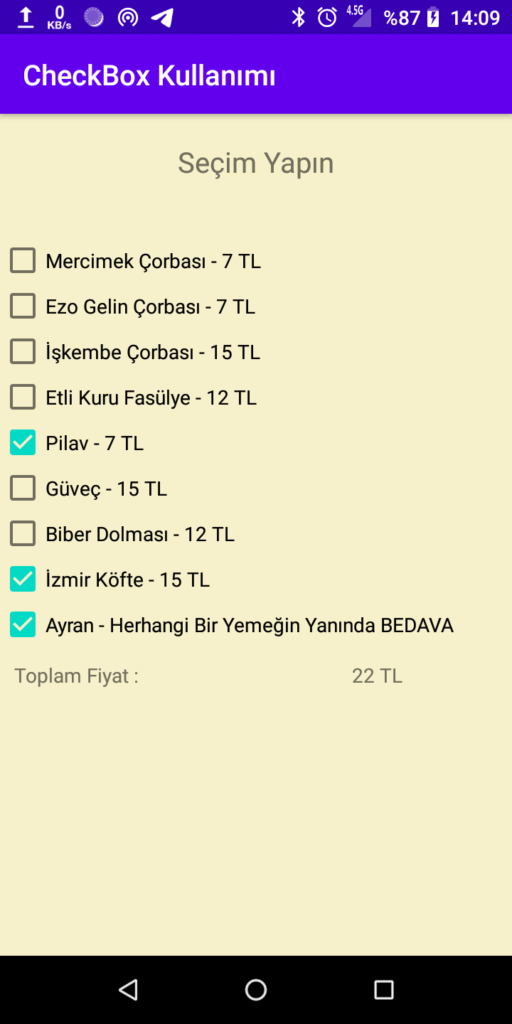
Xml tarafında yapılan tüm işlemleri rahatlıkla anlayabilirsiniz diğer derslerden gelen tecrübeyle. Java dosyasında farklı bir şeyler yaptık(9-10 tane yiyecek çeşidi var ama hepsinde de aynı mantık kullanıldı. Bu sebepten sadece birine değineceğim).
chb_mercimek.setOnClickListener(new View.OnClickListener() {
    @Override
    public void onClick(View view) {
        if (chb_mercimek.isChecked()){
            tFiyat += 7;
            txt_toplamFiyat.setText(tFiyat + " TL");
        }else {
            tFiyat -= 7;
            txt_toplamFiyat.setText(tFiyat + " TL");
        }
    }
});
Daha öncesinden setOnClikListener metodunu işlemiştik(Button Tıklama ve Toast Kullanımı). Bu metot sayesinde tıklandığında yapılacak olan işlemleri gerçekleştirebiliriz. Biz checkBox’a tıkladığımız an hem setOnClickListener hem de if koşulu çalışacaktır. Böylelikle toplam fiyata anında 7 TL eklenmiş olacaktır. Yok eğer vazgeçmek istersek tekrar tıklayıp seçili alandan vazgeçilmesini sağlayarak else bölümünü çalıştırmış olacağız. Orada da -7 TL işlem gerçekleştiğinden sağlıklı bir hesaplama işlemi yapılmış olacaktır.
Switch Kullanımı
Switch yapısını kullanıcıya iki seçenek sunarken kullanırız. Örnek vermek gerekirse kapalı/açık veya gece/gündüz gibi seçenekler sunarken sıkça kullanılır.
Oluşturacağımız örnek uygulama;

Switch’e tıklandığı zaman arka plan rengi siyah, yazı rengi beyaz ve yazının kendisi “Gündüz Yap” olacak. Her tıklamada tam tersi olacak.
Activity_main.xml dosyası;
<?xml version="1.0" encoding="utf-8"?>
<LinearLayout xmlns:android="http://schemas.android.com/apk/res/android"
    xmlns:app="http://schemas.android.com/apk/res-auto"
    xmlns:tools="http://schemas.android.com/tools"
    android:layout_width="match_parent"
    android:layout_height="match_parent"
    android:orientation="vertical"
    android:gravity="center|top"
    android:id="@+id/ll_duzenle"
    tools:context=".MainActivity">

    <Switch
        android:id="@+id/swt_gece_gunduz"
        android:layout_width="150dp"
        android:layout_height="wrap_content"
        android:layout_marginTop="30dp"
        android:padding="10dp"
        android:text="Gece Yap"/>

</LinearLayout>
MainActivity.java dosyası;
package com.mrcaracal.myapplication;

import androidx.appcompat.app.AppCompatActivity;

import android.os.Bundle;
import android.widget.CompoundButton;
import android.widget.LinearLayout;
import android.widget.Switch;

public class MainActivity extends AppCompatActivity {

    Switch swt_gece_gunduz;
    LinearLayout ll_duzenle;

    private void init(){
        swt_gece_gunduz = findViewById(R.id.swt_gece_gunduz);
        ll_duzenle = findViewById(R.id.ll_duzenle);
    }

    @Override
    protected void onCreate(Bundle savedInstanceState) {
        super.onCreate(savedInstanceState);
        setContentView(R.layout.activity_main);
        init();

        swt_gece_gunduz.setOnCheckedChangeListener(new CompoundButton.OnCheckedChangeListener() {
            @Override
            public void onCheckedChanged(CompoundButton compoundButton, boolean b) {
                if (b){
                    swt_gece_gunduz.setText("Gündüz Yap");
                    ll_duzenle.setBackgroundColor(getColor(R.color.Siyah));
                    swt_gece_gunduz.setTextColor(getColor(R.color.Beyaz));
                }else {
                    swt_gece_gunduz.setText("Gece Yap");
                    ll_duzenle.setBackgroundColor(getColor(R.color.Beyaz));
                    swt_gece_gunduz.setTextColor(getColor(R.color.Siyah));
                }
            }
        });
    }
}
Burada sizde hata verecek bir yer bulunmakta. Orası da;
ll_duzenle.setBackgroundColor(getColor(R.color.Siyah));
swt_gece_gunduz.setTextColor(getColor(R.color.Beyaz));
Şu kısımlarda olduğu gibi “Siyah” ve “Beyaz” yazan yerler. Ben colors.xml dosyasında bu renkleri tanımlayıp oradan çektim.
Siz de bunu yapmak için;
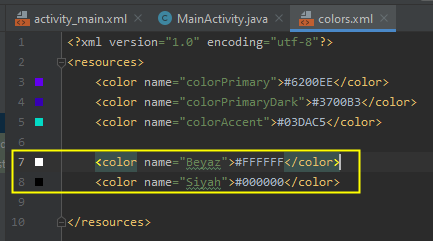
- app > res > values > colors.xml dosyasını açın
- Aşağıdaki görselde işaretli olan kısmı kendi dosyanıza ekleyin.
Her şey tamam olduğuna göre uygulamayı çalıştırabilirsiniz ama ondan önce kodlardan biraz bahsedeyim.
Switch yapısında tıklanma özelliği için setOnCheckedChangeListener’ı kullandık. Daha sonra iç tarafta seçili olup olmadığını ise parametreden aldığımız b ile kontrol ettik. Bu parametreden aldığımız b siz de farklı gözükebilir. Mesela sizde isChecked olabilir. Kısacası orda ne yazıyorsa onu alın. Geriye kalan kısımlarda sadece set etmek kaldı. Onu da yaptık.
Uygulamanın Örnek Çıktısı;

CheckBox ve Switch yapısı çok daha özgün yerlerde de kullanılabilir. Bu size kalmış artık. Bir sonraki dersimizde görüşmek üzere.